A good backpack makes all the difference when hiking, especially if you are going long distances. With the rise in outdoor and adventure photography, the market has seen a big increase in great camera bags designed for hiking and adventure, as well as photography. There are brands known specifically for this type of bag, such as Mindshift Gear and F-Stop, but even the traditional camera bag companies have entered the arena.
Lowepro, one of the most famous, and well-respected, camera bag companies in the market joined the outdoor hiking market in a big way with its Whistler series. The Whistler line was designed with the assistance of world-renowned ski photographer, Paul Morrison, whose influence can be seen throughout the bag.
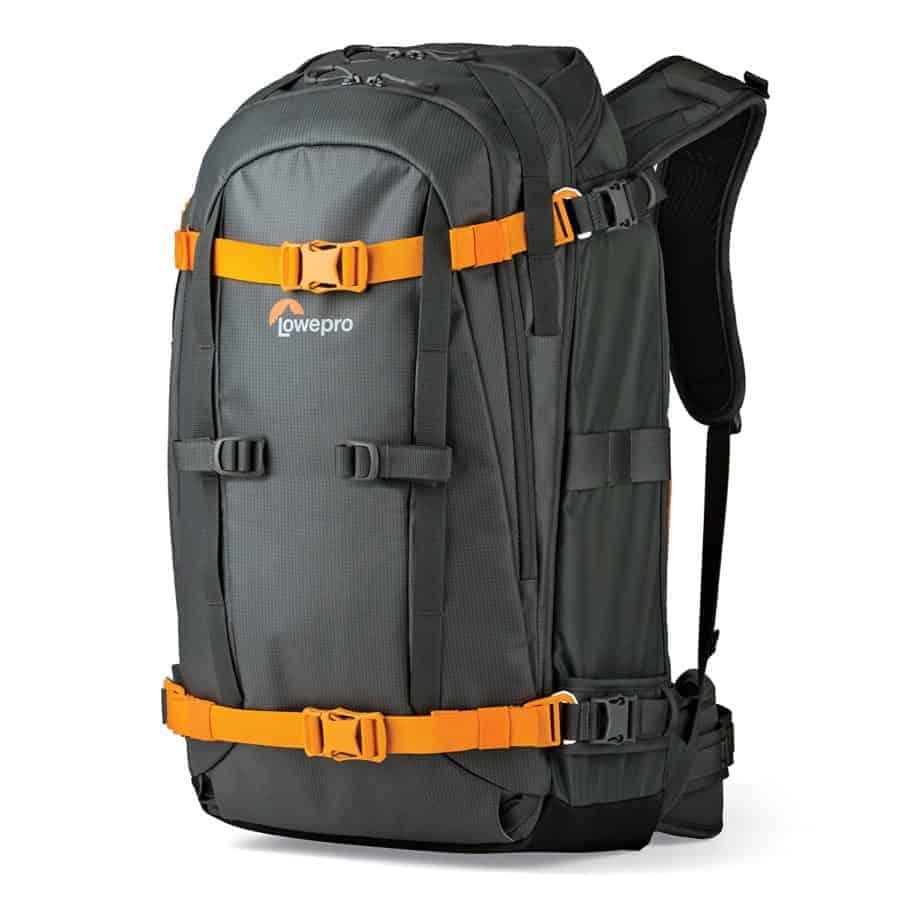
I have been using the Lowepro Whistler BP 450 AW for much of my hiking needs for the past year or so and wanted to share all my thoughts with our readers.
What I Care About in a Hiking Camera Bag
I have tried out more than a dozen different camera backpacks for hiking and there are a few things that really matter to me.
First, and most important, is comfort. For this, a good bag designed for hiking is a must. If you are going on a multi-day trek, you may need a more dedicated backpacking bag, but I mostly hike with just a good, heavy-duty camera backpacks.
Second, the size of the bag is going to depend on what kind of hiking you do, but I prefer a bigger bag with lots of room to carry everything I want so I don’t have to leave something behind that will make my experience more enjoyable.
Third, I want a bag that makes sense, meaning easily accessible gear, a good tripod holder and good organization. Of course, there are a ton of other little things that go into a good hiking camera bag and I will address as many of those as possible throughout my review of the Lowepro Whistler BP 450 AW.
Finally, I want a bag that is good quality. i want it made of materials that are going to withstand the elements, take a good beating, protect my gear and last a long time.

THe Whistler’s Comfort
The Lowepro Whistler is very comfortable. It is definitely one of the most comfortable bags I have used, despite being one of the biggest. It has a nice padded back and great shoulder straps that fit very comfortable on me. I also like the chest strap and waist strap.
According to Lowepro, their ActivZone™ harness system provides targeted 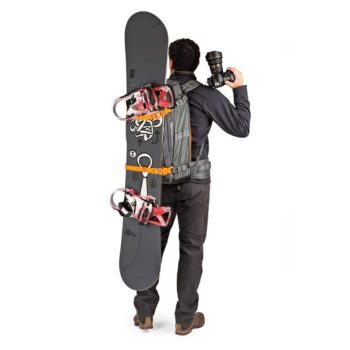 padding and support for comfort on the move. I don’t know what that really means, but I can say that whatever they are doing is working, because the bag was very comfortable as I have hiked and been active with it.
The shoulder straps are surprisingly comfortable given they aren’t hugely padded. I think the extra width on the straps goes a long way to adding to the comfort. The non-stick material also helps as they weight doesn’t slide around and tug on your shoulders. The straps are obviously designed to be in snowy conditions so they handle moisture well and aren’t going to get uncomfortable hiking in the heat.
The ActivZone padding on the back of the bag is also really nice without being overly bulky. It provides excellent comfort and ensures that the bag doesn’t slip or shift.
The Whistler’s Size
The Whistler bag comes in two sizes, the 450 and 350. I opted for the larger 450 and love it.
The 450 has internal dimensions of 24.2 x 16.6 x 40 cm (9.53 x 6.54 x 15.75 in), external dimensions of 31 x 30.2 x 57.2 cm (12.20 x 11.89 x 22.52 in) and a weight of 3.31 kg (7.28 lbs).
The smaller 350 has internal dimensions of 23.2 x 16 x 35.3 cm (9.13 x 6.30 x 13.90 in), external dimensions of 29.5 x 30 x 53 cm (11.61 x 11.81 x 20.87 in) and a weight of 3.31 kg (7.28 lbs).
The 450 size can fit a ton of gear. I recently took it on a trip to Idaho and I easily fit all my camera gear and five days worth of clothing and other gear. It is also designed really well to attach all kinds of hiking or camping gear to the outside of the bag to maximize space. I always bring carabineers with me to make it even easier to attach things to any backpack.
The insert for your camera bag is designed so well and has plenty of space. While I prefer my light Fuji system for action photography and hiking, I loved all the space to fit a bunch of lenses, back-up system and all kinds of accessories.
Even with a big system, this bag is going to work great. If you are on a full-frame system, you will have no trouble with a couple bodies, the trinity of lenses, and accessories. Even with a larger telephoto lens, like the Canon 200-400, you will have no problem fitting a couple bodies and extra lenses.

The Whistler’s Organization
I really like the organization on this bag. It is quite different than the other hiking camera bags I have used, and there is a lot of ingenuity packed into the design.
Main Gear Pocket
The main compartment is set up like most any other camera backpack and is easy to adjust. This compartment is accessible from a hinged back panel/zipper which is especially useful for hiking and reaching your gear in inclement weather. This is one of those little things that show this bag was designed for exposure like snow. The hinge means you can easily access your gear without having to completely open the pocket to expose all your gear.
Photographers are divided about having the gear pocket accessible from the back of the compartment. I initially was not thrilled with it when I first started using bags designed in that manner, but it has since become my preferred set up. I like that my tripod or other gear attached to the outside of the bag doesn’t get in the way, or worse, have to be removed to access my camera. It can also be nice as I can slide the bag around to the front and access my gear without taking the bag off when I am hiking in water or climbing a rock wall.
The packing compartment includes Lowepro’s MaxFit™ system of  customizable dividers, which are what you would expect from a camera bag, but with a bit more ability to fine tune to your needs. One thing I have not seen on other bags is that some of the dividers have little pockets inside them so you can pack smaller items to keep them extra safe with lots of padding if you want. The insert is also removable so you can take it out when you want to mix it up or to dry out the bag.
One downside some may find with the Whistler system is the removable insert is only offered in one size. Many of the systems offer various sizes for you to work with, but not the Whistler. This actually doesn’t bother me too much because I don’t like the insert design on most bags, but the insert on the Whistler fits so perfectly, I did not even realize it was an insert for a long time. It just feels like part of the bag, except you do have the ability to remove it when needed.
Part of the insert not really feeling like an insert is the thick padding and protection built into it. I am telling you, this bag is going to protect your gear, probably better than just about any other bag I have tested. There is some downside as the insert is a tad heavier than you would find in comparable bags. This could be an issue if you are going for ultimate lightweight, but it has never bothered me.

The gray and orange dividers and insert part of the bag are also surprisingly practical. Most camera bags I use have black interiors, which looks slick, but tends to blend in with all my gear. Even little pieces of gear stand out against the orange and gray, making it easy to find whatever you are looking for.
The insert also has a zippered top that I really like. It rolls up and is out of the way most of the time when I am not using it, but I love it when I am traveling. This bag isn’t just an adventure bag for me. I love it for traveling on photography-centered trips and I always have my laptop with me. With the zippered top over my camera gear, I can easily fit my 15.4 inch laptop in the main pocket and still have it separate from my gear.
Front Pocket
The front of the bag has a big open pocket, that is great for shoving in all your bulkier non-camera items, or just for packing clothes. The design of this bag is really geared toward adventurers and it can be seen in this front pocket.
This pocket has some really awesome features that are not immediately apparent. The pocket is expandable to fit even more additional gear. It also has a waterproof barrier that separates wet gear from the main gear compartment, and even includes drain holes at the bottom. The barrier is also reinforced so you don’t have to worry about crampons, ice picks, shovels and such breaking your camera gear in the main compartment. I absolutely love all the little well thought-out details of this bag.
While this bag does not have a dedicated pocket for a hydration bladder, which I like since I never use one, the front pocket does have a clip in the front pocket designed to hold a hydration bladder. The drinking tube would have to exit through the zipper, but could easily be strapped down with all the straps on the bag to keep it from being too inconvenient.

Large, Inside Zippered Pocket
There is another fairly large zippered pocket on the inside that works well for holding a lot of the smaller items you may have. I used that pocket for my charger, lenspen, memory card wallet, remote, lens cloths and quick release plates.
Memory Card Pockets
There are also special pockets on the inside for memory cards. They would work great for memory cards, but I keep my memory cards in a separate wallet so they were not useful for that to me. They were, however, just big enough for spare batteries, which I really like in a bag. While they were adequate for extra batteries, they were not the most convenient as they have a fold-over top that is difficult to maneuver on and off the batteries.
Top Pocket
One of my favorite pockets on this bag is at the very top. It is very easy to access and is bigger than you would think so it can fit quite a bit of the gear that you want easy access to.
There is also a nice built-in key leash that is perfect for attaching things like a memory card wallet or anything else you don’t want to risk losing or want for quick access. The top pocket also includes a zippered pocket with a second built-in key leash.

Outside of the Bag
As I mentioned above about size, the Whistler is designed really well to attach all kinds of hiking or camping gear to the outside of the bag. There are straps all over where you can clip carabiners or any gear you want. I seriously love this design feature.
As you can see from the image to the right, you can even attach heavy gear like skis, snowboard, tents or a pro tripod to the sides of the pack and still have access to the main compartment. The rigid structure of the bag is built to support this heavy gear so it works really well, and having access to the main compartment of the bag without having to remove stuff attached to the outside is an absolute game changer as I have not been able to do that on all my bags, and it sucks!
Tripod attachment is a big deal for me on camera bags, and this bag knocks it out of the park given its design to carry much bigger items. You will have no problem carrying any size tripod with this bag. I also like that there are straps for carrying it on the front or sides of the bag. That way you can put it wherever is going to be most comfortable for you.
Side Pockets
There are additional side pockets on the bag, but they are nothing special. They are fairly small and not super useful, but if you have something small that you want quick access to or separation from other gear, the side pockets will work great.
What I would have preferred here instead of these side pockets are some mesh pockets for water bottles. As I said above, I don’t use a hydration bladder so I like quick access to water when I am hiking and mesh pocket is perfect for that. I have a work-around by hooking a bottle to the straps, but I would prefer the dedicated pocket on the side.
Waist Strap
The waist strap is awesome on this bag. I especially love that they put an easy access pocket on the waist strap as this is something so easy and convenient, but surprisingly isn’t offered on as many bags as I had anticipated. It is especially nice that it easily fits a smaller phone like I carry. The opposite side of the waist strap also has an accessory rail, which I love for hooking on my Peak Design Clip, Cotton Carrier or Spyder Holster.
Quality and Materials
As you would expect from Lowepro, the quality on this bag is more than respectable. What I really love though are the materials the bag is made of. It is definitely designed to withstand harsh conditions and keep your gear safe and your body comfortable.
The bag is made of durable, weather-resistant and hardware including 420 denier ripstop nylon with TUP face coating, glove-friendly Nifco side-release buckles, all-metal Duraflex hooks and Hypalon base.
The Whistler comes with a detachable All Weather AW Cover™ to use if you feel the need to protect your gear from rain, snow, dust and sand. I have never used this so I can’t give much of a review on it. With the excellent weather-proofing of the bag and its TPU coating, I have never been concerned about the bag in the rain without the cover, but If I was going to be in heavy rain for a long time or stuck in a dust storm, I suppose I would probably give the cover a try.
The zippers on this bag are nice. They may not match the smoothness and quality of my favorite zippers on the bags from Think Tank and Mindshift Gear, but they work well and are specially designed to be easy to use with gloves on, which is nice for cold-weather shooting.

Conclusion
The Lowepro Whistler is a real competitor in the market for the large outdoor/hiking camera bags. If you are into winter sports at all, then there should be no question that this is the bag you want. I also love it if you are going to be shooting a lot in hot, humid weather as the design is going to keep you comfortable and your gear dry. I also like it for the non-adventurer photographer that travels a lot and wants to fit everything in their camera bag. While there are definitely some things I prefer in the competition, this bag is a great value, very capable and a key part of my personal bag collection.
You can pick up the bag on Amazon for $230 at the time of this article. For more great backpacks, check out our recommended gear.